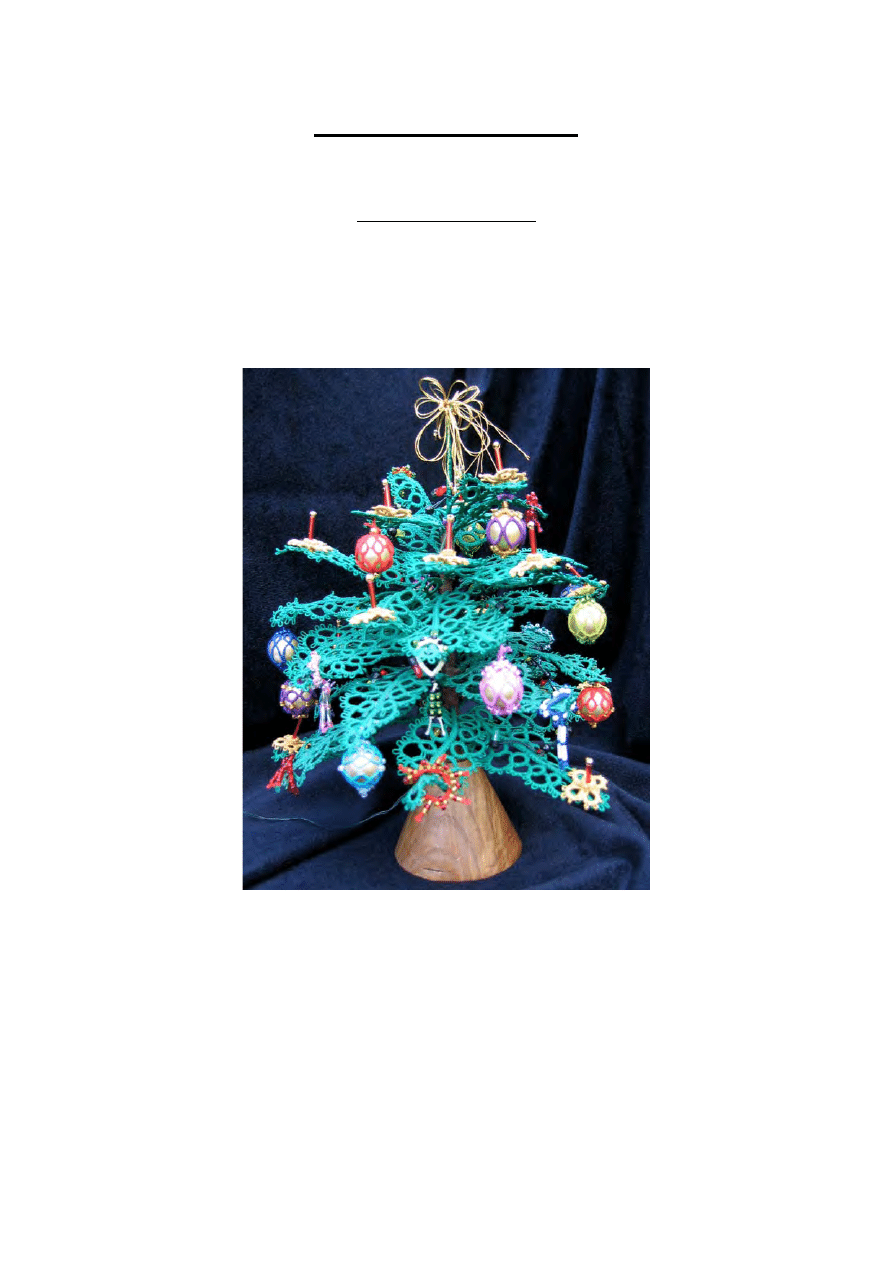
Tatted Christmas Tree
By Jennifer Williams
© Jennifer Williams 2004
e-mail – maricajenda@hotmail.com

ABBREVIATIONS
R
ring
CH chain
cl
close
ring
RW reverse
work
p
picot
vsp very
small
picot
LP long
picot
VLP
very
long
picot
SLT
shoe lace trick
sj or
shuttle join
DNRW
do not reverse work
SH
shuttle (as in SH 1)
SS swap
shuttles
B
bead (3B = 3 beads)
join
to…..
1
Tatted Christmas Tree
© Jennifer Williams 2004
The Christmas tree is tatted with size 20 thread. Each branch is tatted over
20 gauge, green coloured wire, and florist’s tape is used for the assembly.
The candle holders are tatted with Altin Bstak, (which is equivalent to about size 40)
colour 2351, for the candles you need Mill Hill long bugle beads and a size 11 seed
bead (or larger than the hole in the bugle bead).
The baubles are tatted in size 80 thread with seed beads of your choice and a inch /
1·5 cms wooden bead painted gold with nail varnish.
The decorations are made using size 20 thread and a variety beads.
The star was tatted with a fine gold thread, worked double, and is a ring with uneven
long picots separated by a double stitch. The one in the picture was tatted by Jean
Johnston.
The Christmas Tree.
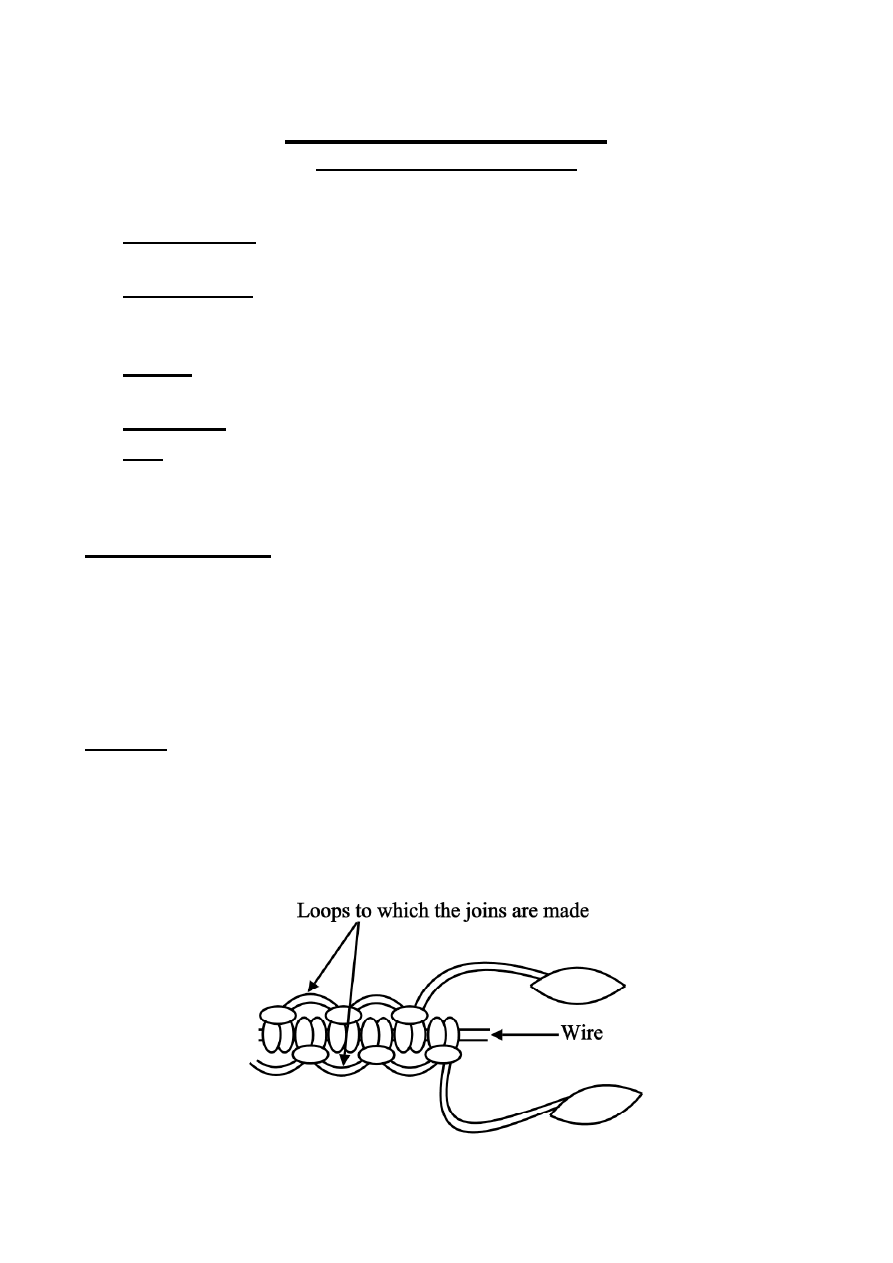
Cut 36 pieces of wire 10 – 12 inches / 25 – 30 cms long. With round nosed pliers
curl one end into a very small ring (which will be hidden by the tatting). This ring
acts as an anchor from which to start the pearl tatting and it prevents your work from
sliding off the wire. Do not cut the wire when the required number of double stitches
have been worked as the bare wires will be bound together later to form the trunk.
Branch 1 Make
1
Wind two shuttles CTM with enough thread to work the pearl tatting.
Pass a loop of thread through the ring on the wire and bring the shuttles through this
loop. Work 1 double stitch with shuttle 1, then turn the work over and make 1 double
stitch with shuttle 2. This is repeated along the wire for the required number of times.
For the first ‘branch’ pearl tat for about 3 – 4 inches / 8 – 10 cms. Do not cut the wire.
©
J
e
n
n
if
e
r
W
il
li
a
m
s
2
0
0
4
2
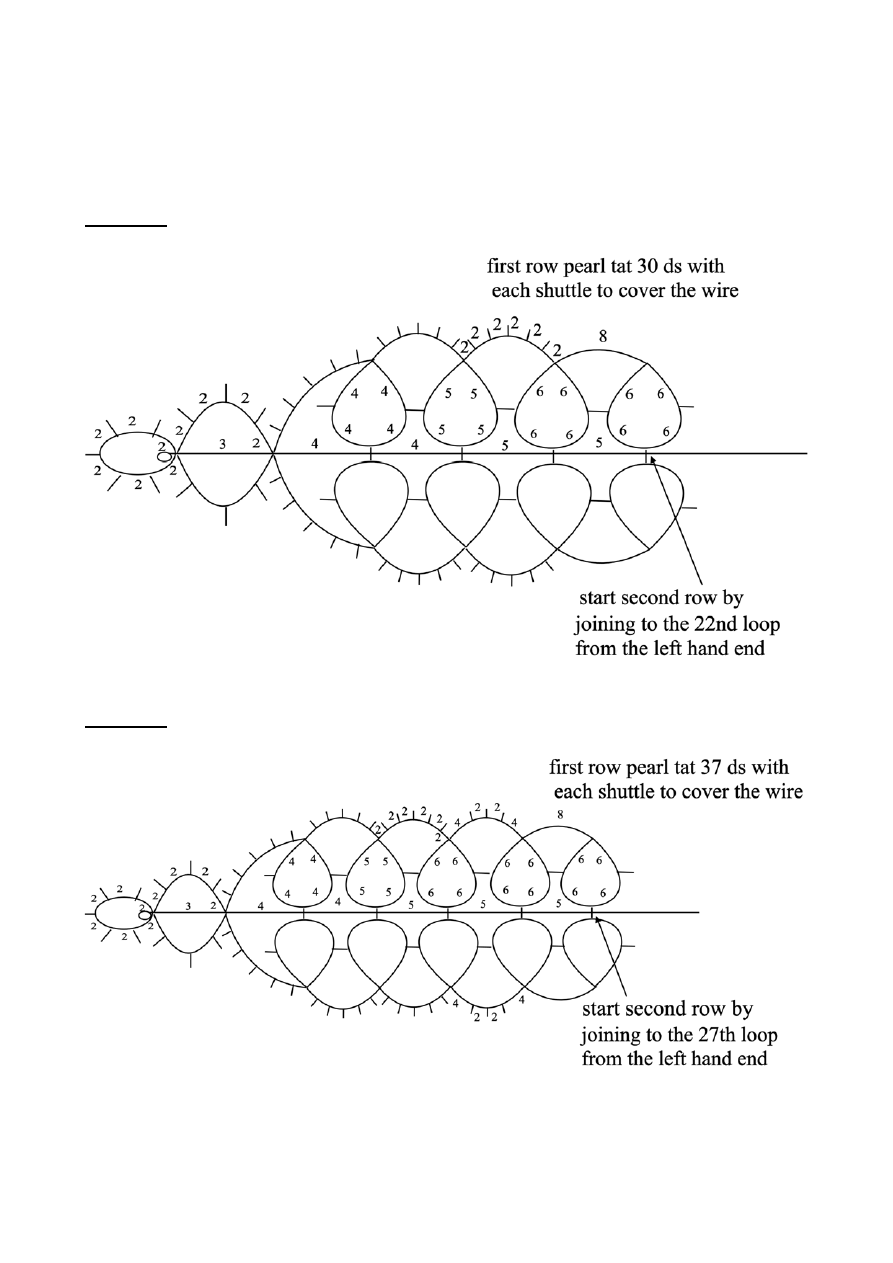
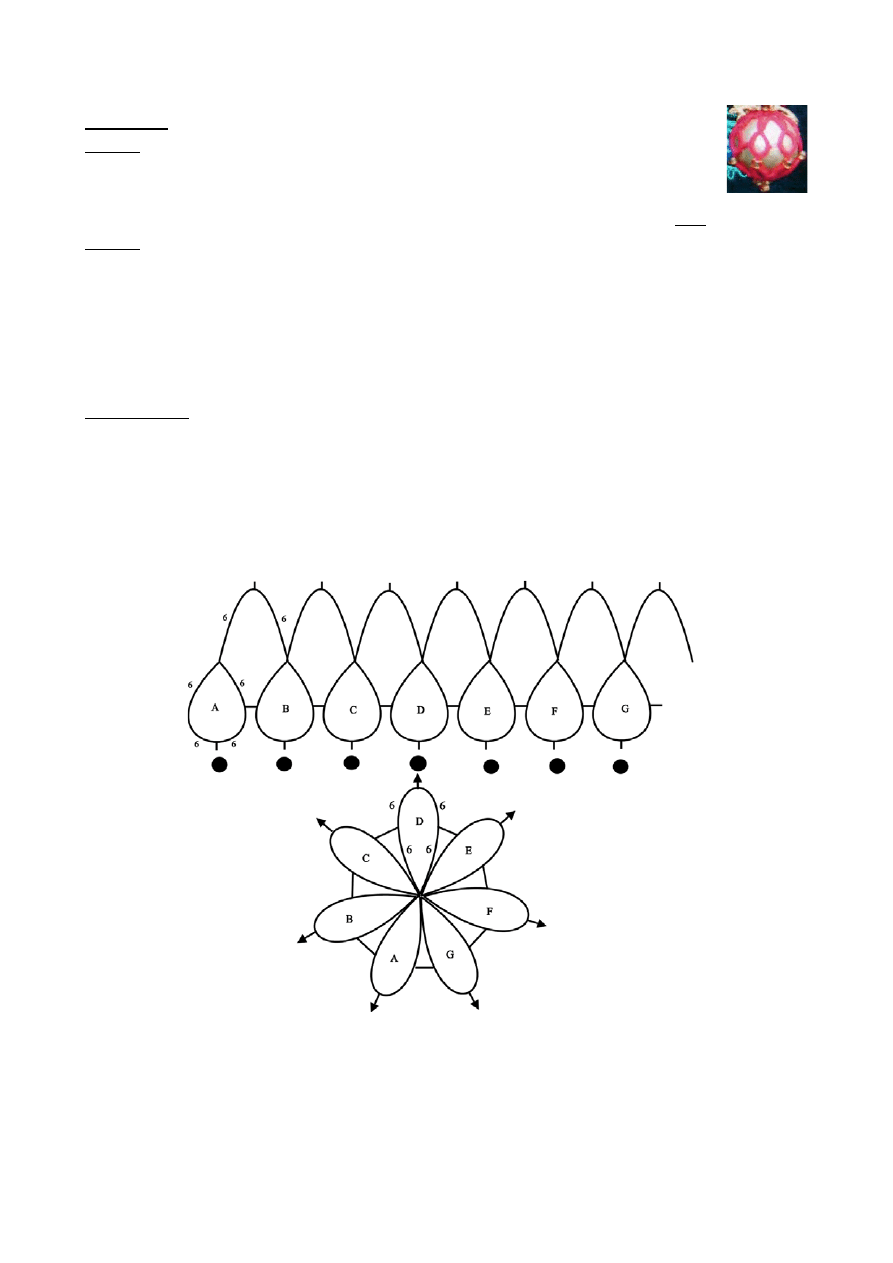
Branch 2 Make
3
As for ‘branch 1,’ working at least 22 ds with each shuttle. Cut thread leaving long
enough ends to secure later.
Wind a shuttle but do not cut from the ball.
Work towards the tip of the branch on one side of the pearl tatting, then back along
the other side.
Joins are made to the ‘loops’ between the double stitches of the pearl tatting.
Start by joining to the 17
th
loop from the start of the pearl tatting and working
towards the tip of the ‘branch’.
CH. 8, RW
R.
5, p, 5, + to 5
th
loop along, 5, p, 5 cl RW
CH. 2, (p, 2,) X 5 RW
R.
4, + to previous ring, 4, + to 4
th
loop along, 4, p, 4 cl RW
CH. As above but do not RW, sj to 4
th
loop along,
CH. 2, (p, 2,) X 3 sj to 3
rd
loop along (this should be at the end of the first side)
CH. 2, (p, 2,) X 5 sj to1st loop on second side
CH. 2, (p, 2,) X 3 sj to 3
rd
loop along
CH. 2, (p, 2,) X 5 RW
R.
4, p, 4, + to 4
th
loop along, 4, p, 4 cl RW
CH. 2, (p, 2,) X 5 RW
R.
5, + to previous ring, 5, + to 4
th
loop along, 5, p, 5 cl RW
CH. 8 cut and tie to the 5
th
loop along. Secure ends
©
J
e
n
n
if
e
r
W
il
li
a
m
s
2
0
0
4
3
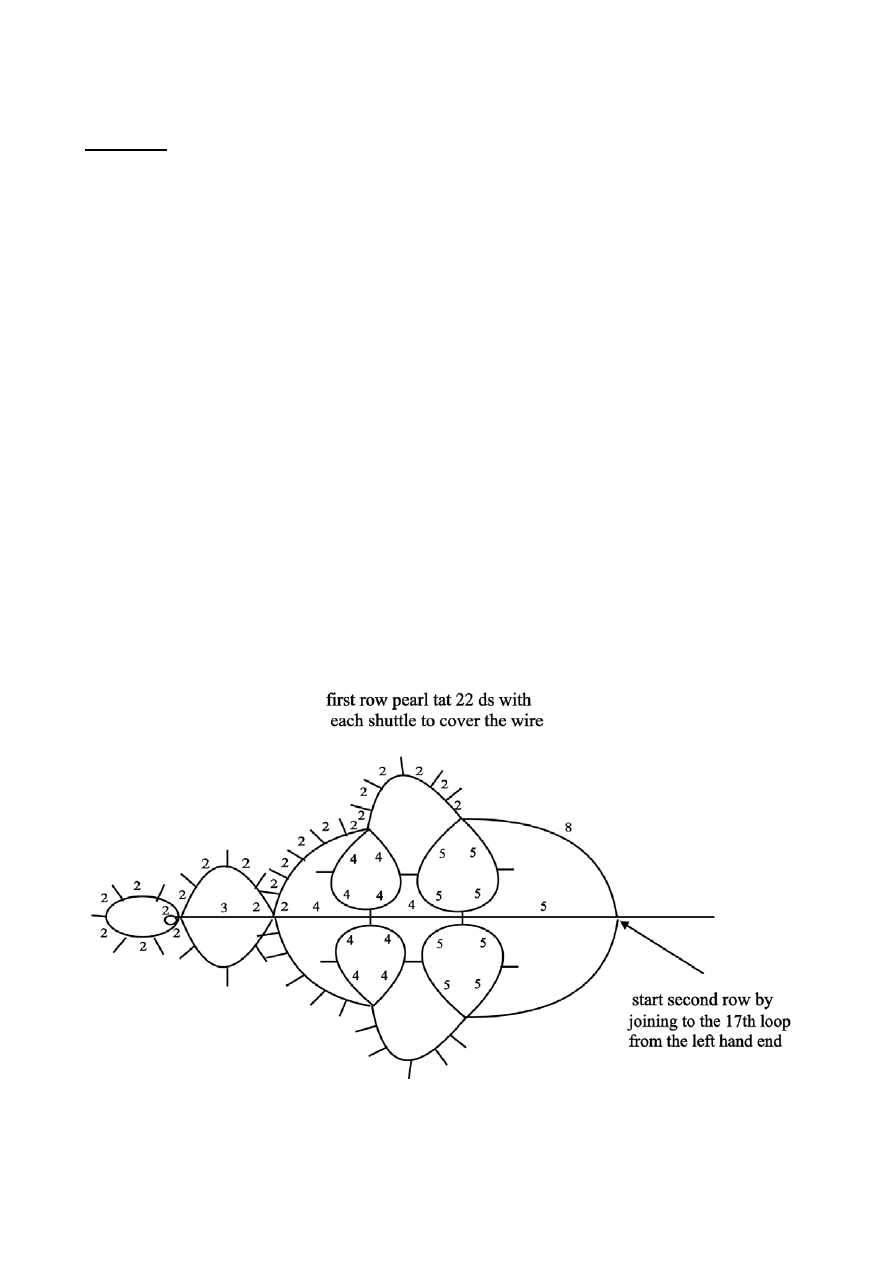
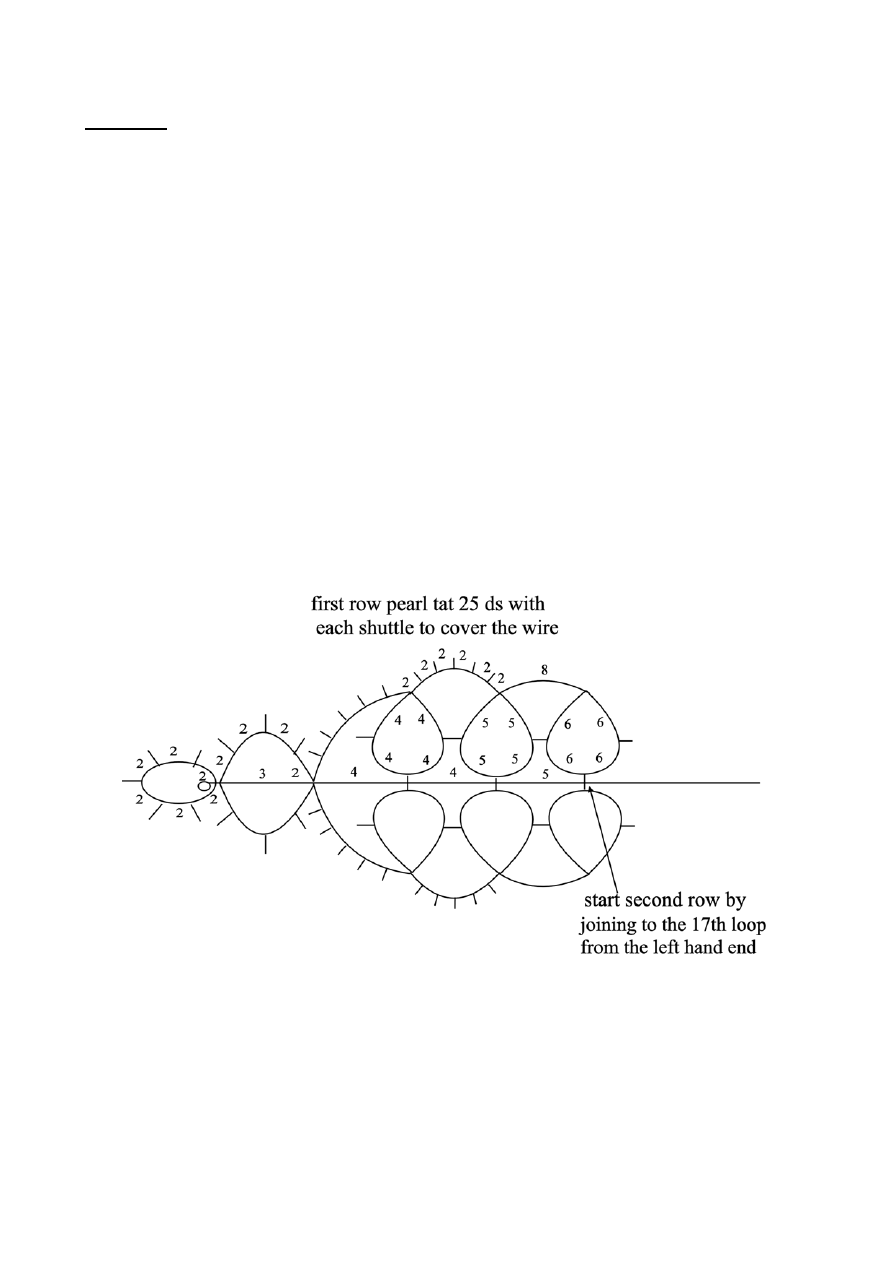
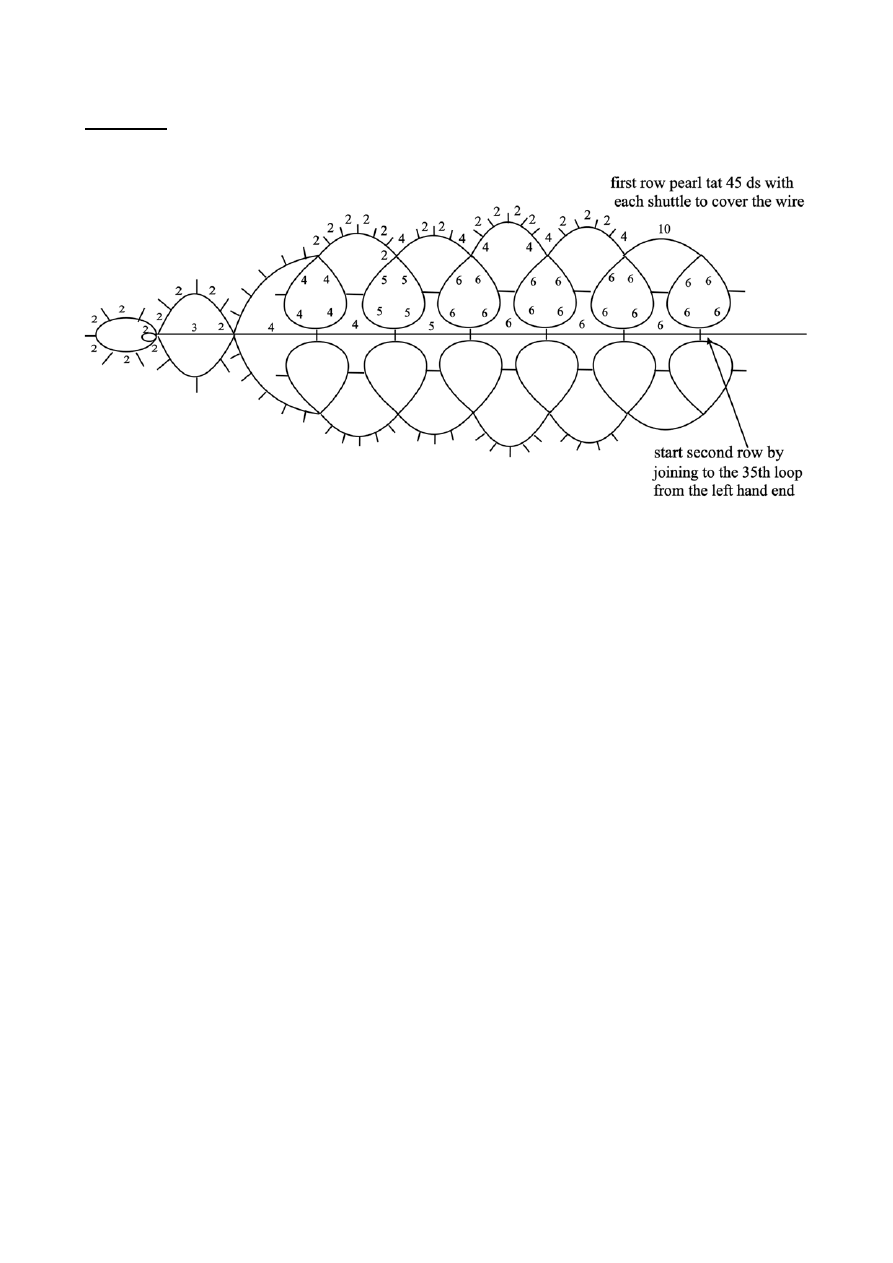
Branch 3 Make
4
Work as for branches 1 and 2 for at least 25 ds with each shuttle.
Wind a shuttle but do not cut from the ball.
R.
6, p, 6, + to 17
th
loop from the point, 6, p, 6 cl RW
CH. 8 RW
R.
5, + to previous ring, 5, + to 5
th
loop along, 5, p, 5 cl RW
CH. 2, (p, 2,) X 5 RW
R.
4, p, 4, + to 4
th
loop along, 4, p, 4 cl RW
CH. As above but do not RW, sj to 4
th
loop along,
CH. 2, (p, 2,) X 3 sj to 3
rd
loop along (this should be at the end of the first side)
CH. 2, (p, 2,) X 5 sj to1st loop on second side
CH. 2, (p, 2,) X 3 sj to 3
rd
loop along
CH. 2, (p, 2,) X 5 RW
R.
4, + to previous ring, 4, + to 4
th
loop along, 4, p, 4 cl RW
CH. 2, (p, 2,) X 5 RW
R.
5, + to previous ring, 5, + to 4
th
loop along, 5, p, 5 cl RW
CH. 8 RW
R.
6, + to previous ring, 6, + to 5
th
loop along, 6, p, 6 cl. Cut and secure ends.
©
J
e
n
n
if
e
r
W
il
li
a
m
s
2
0
0
4
4
Continue working from the diagrams making 5 of the 4
th
branch, 6 of the 5
th
branch
and 16 of the 6
th
branch. This will give a ‘full’ tree but the shape can be changed by
working a different number of each branch size.
Branch 4 Make
5
Branch 5 Make
6
©
J
e
n
n
if
e
r
W
il
li
a
m
s
2
0
0
4
5
Branch 6 make16
When all the branches have been worked secure all the ends and stiffen them to help
them keep their shape.
To assemble the tree, first lay the branches out in order of size.
1) Take the first branch, the one that has just the pearl tatting, and wind the florist’s
tape round once or twice to cover the end of the tatting – this will be the trunk of
the tree.
2) Take one of the smallest branches, hold it with the trunk and wind the tape round
once or twice, covering the end of the pearl tatting, to hold it in place.
3) Continue adding the branches, rotating the trunk a bit each time. Do not space
them out or the tree will be spindly.
4) Continue winding the tape for about 2 inches / 5 cms after the last branch to make
the trunk. Cut the wires level and cover the sharp ends with the florist’s tape.
5) Now hold the trunk in one hand, and fold down the branches one by one with the
other.
©
J
e
n
n
if
e
r
W
il
li
a
m
s
2
0
0
4
6
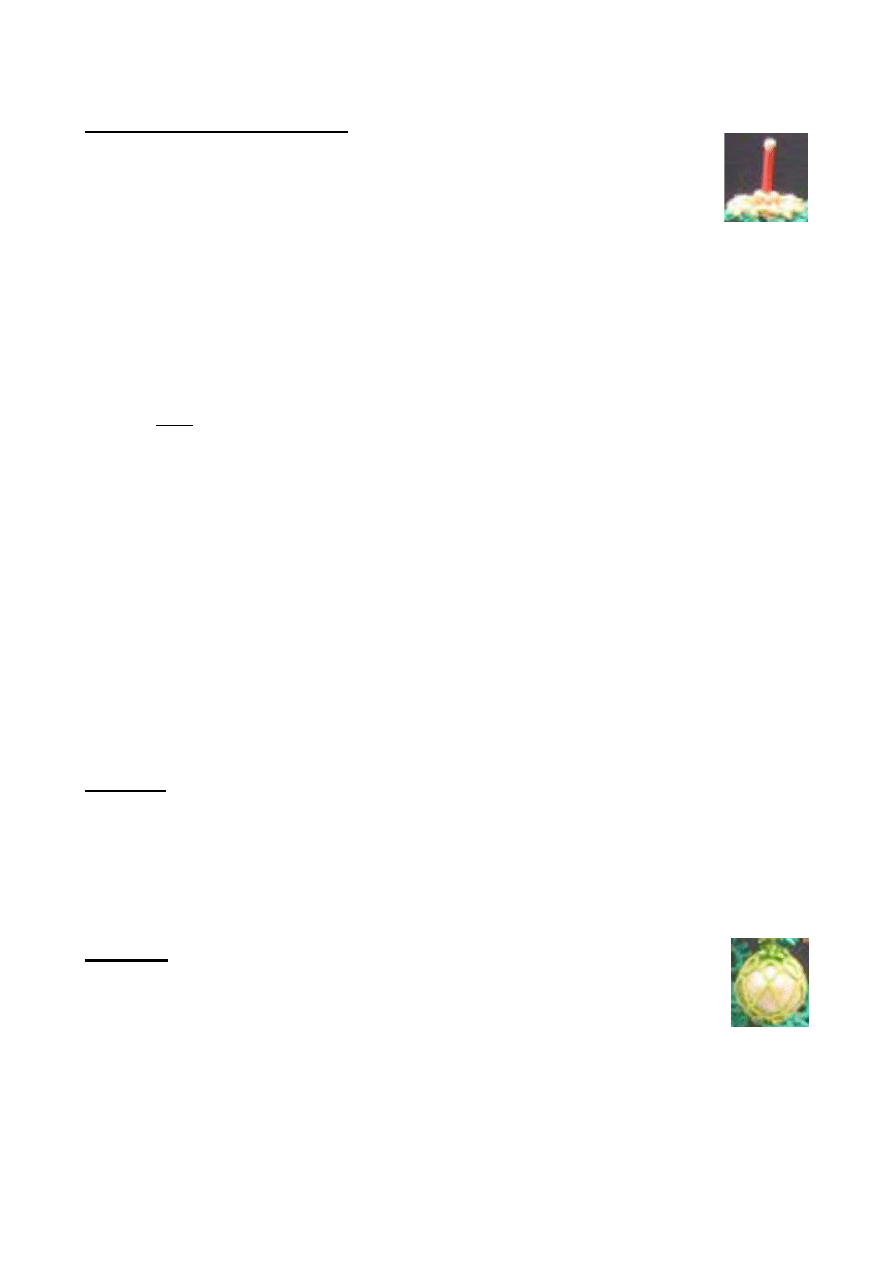
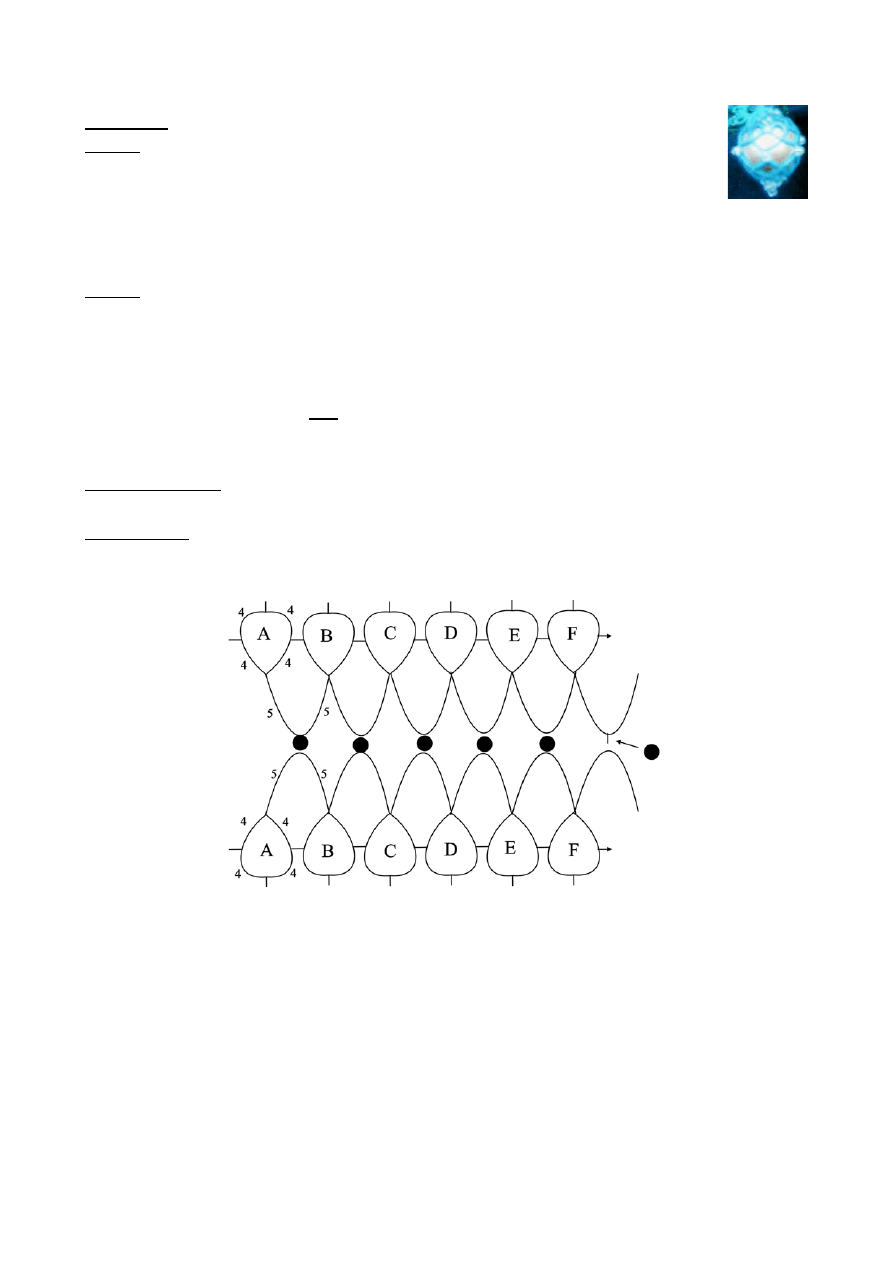
Candle holder and candle
The candle holders are tatted with Altin Bstak, which is equivalent to
about size 40, colour 2351, but you could use another thread of similar
thickness. For the candles you need Mill Hill long bugle beads ( inch /
12·5 mm), a size 11 seed bead (or larger than the hole in the bugle bead)
and a beading needle.
Worked with a shuttle only, leave an end of about 8 inches / 20 cms
R.1 3, (p, 3,) X 5 cl
R.2 3, + to last picot on ring 1, 3, (p, 3,) X 4 cl
R.3 3, + to last picot on ring 2, 3, (p, 3,) X 4 cl
R.4 3, + to last picot on ring 3, 3, (p, 3,) X 3, + to 1
st
picot of ring 1, 3 cl
Leave a very small space and continue
R.5 (to hold the candle) 12 cl small enough to fit round the bugle bead
R.6 repeat ring 5
Cut leaving an 8 inch / 20 cms end.
Pull the end through to the under side of the candle holder and tie to the starting
thread.
Thread one of these ends onto the beading needle and pass it up through the centre of
rings 1 – 4, and through rings 5 and 6 then through a bugle bead. Pull the thread right
through then pass the needle through a seed bead, back down the bugle bead and
down to the underside of the candle holder and secure.
Rings 5 and 6 should be held in place by the bugle bead, but a securing stitch made
with the spare thread can be made if desired.
The two ends can be used to tie the candle holder to the tree.
Baubles
The baubles are tatted in size 80 thread with seed beads of your choice.
Wooden beads, inch / 1·5 cms diameter and gold, silver or red nail varnish.
Start by threading the wooden beads on cocktail sticks and painting them with the
nail varnish.
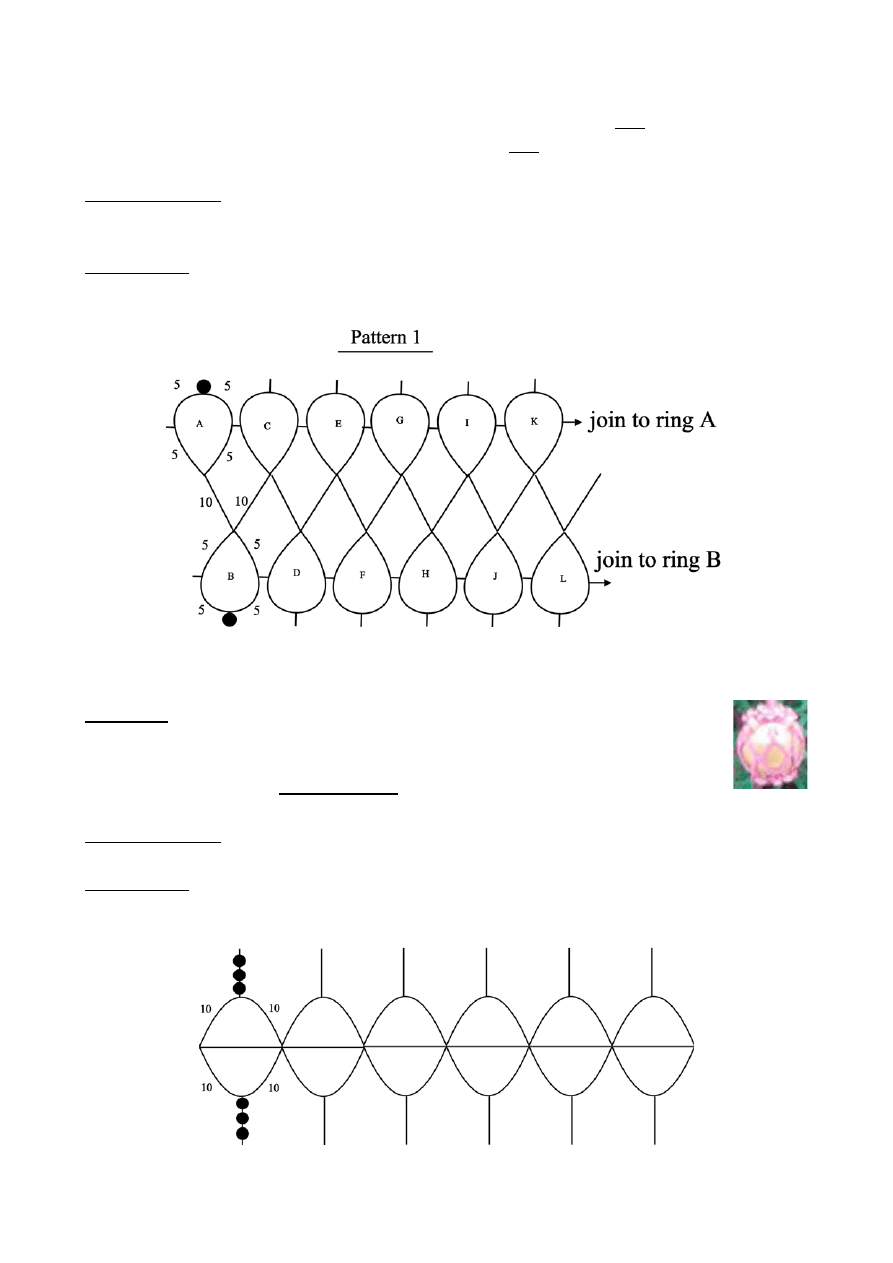
Pattern 1 (green with green beads)
This pattern can be worked using two shuttles or by making a SLT,
where necessary, to position the threads correctly for the next element.
SH 1
R.A
5, p, 5, p, 5, p, 5 cl RW
CH
10 DNRW but SS
SH 2
R.B
5, p, 5, p, 5, p, 5 cl RW
CH
10 DNRW but SS
*SH 1 R.C
5, + to R.A, 5, p, 5, p, 5 cl RW
CH
10 DNRW but SS
SH 2
R.D
5, + to R.B, 5, p, 5, p, 5 cl RW
CH
10 DNRW but SS
©
J
e
n
n
if
e
r
W
il
li
a
m
s
2
0
0
4
7
Repeat from * four times but remember to join ring K to ring I and ring A, then slip
in the wooden bead before joining ring L to ring J and ring B.
Lace the bottom – with a crochet hook pass a bead onto each picot in turn holding in
place with a needle and thread, pull up the thread and tie, then add a 7
th
bead to the
centre of the cluster, tie the ends and secure.
Lace the top in the same way but bring both ends up through the 7
th
bead and use
them to tie to the tree.
Pattern 2 (pink silver beads)
Measure the size of three beads together and cut a picot gauge just a little
wider.
SR. (10, LP, 10 / vsp (on 1
st
SR only) 10, LP, 10) X 6, cut and tie to the
vsp on the 1
st
SR. Secure ends.
Lace the bottom – put three beads on each long picot and secure with a needle and
thread. Pull up the thread and add one bead to the centre. Secure the ends.
Lace the top in the same way – after inserting the bead – and bring the threads up
through one or two beads and tie to the tree.
©
J
e
n
n
if
e
r
W
il
li
a
m
s
2
0
0
4
8
Pattern 3 (red with gold beads)
Row 1 leave a very small space between the rings.
R.A
6, p, 6, p, 6, p, 6 cl
*R.B
6, + to ring A, 6, p, 6, p, 6 cl
Repeat from * 5 times (7 rings) remembering to join ring G to rings F and A.
Row 2
R.A
6, p, 6, + adding a bead to ring A of row 1, 6, p, 6 cl RW
CH
6, p, 6 RW
* R.B 6, + to previous ring, 6, + adding a bead to ring B of row 1, 6, p, 6 cl RW
Repeat from * joining rings C, D, E, F and G of row 2 (adding a bead each time)
to the consecutive ones of row 1.
Lace the top - thread a length of thread about 10 inches /25 cms long onto a beading
or fine needle, place the wooden bead inside the tatted shape and, with the needle,
pick up all the picots on the chains, tighten the thread and tie. Pass the needle down
through the hole in the wooden bead, add 3 gold beads then bring the needle up
through the wooden bead again. Add another gold bead then use the ends to tie
to the tree.
©
J
e
n
n
if
e
r
W
il
li
a
m
s
2
0
0
4
9
Pattern 4 (turquoise with silver beads)
Row 1
R.A
4, p, 4, p, 4, p, 4 cl RW
CH
5, p, 5 RW
*R.B
4, + to previous ring, 4, p, 4, p, 4 cl RW
CH
5, p, 5 RW
Repeat from * 4 times (6 rings) remembering to join the last ring to the first.
Row 2
R.A
4, p, 4, p, 4, p, 4 cl RW
CH
5, + with a bead to one of the chains on row 1, 5 RW
*R.B
4, + to previous ring, 4, p, 4, p, 4 cl RW
CH
5, + with a bead to the next chain on row 1, 5 RW
Repeat from * to the end NB slip the wooden bead in place before the last two joins
are made.
Lace the bottom – with a length of thread on a beading, or fine, needle gather the
6 free picots on the rings and add a ‘cluster’ of beads, tie and secure the ends.
Lace the top – the same as for the bottom but leave the ends to tie the bauble to
the tree.
©
J
e
n
n
if
e
r
W
il
li
a
m
s
2
0
0
4
10
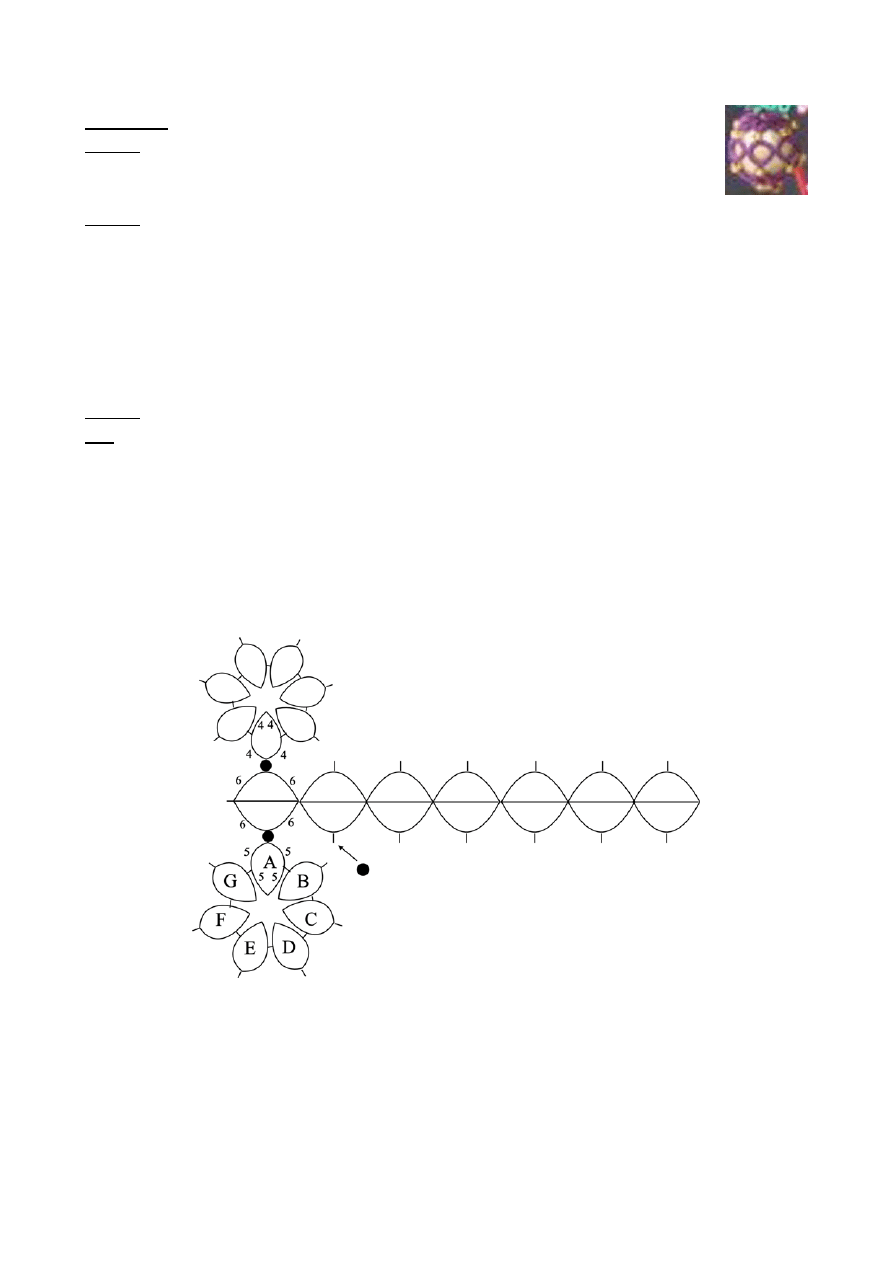
Pattern 5 (purple with gold beads)
Row 1
SR (6, p, 6 / vsp (on 1
st
SR only) 6, p, 6 cl) X 7
Cut and tie to the very small picot on the 1
st
split ring. Secure the ends.
Row 2 leave a very small space between each ring.
R.A 5, p, 5, + with a bead to a picot on a split ring of row 1, 5, p, 5 cl
* R.B 5, + to ring A, 5, + with a bead to the picot on the next split ring of row1, 5, p,
5 cl
Repeat from * 5 times remembering, on the 7
th
repeat, to join to ring A as well as the
previous ring.
Cut, leaving long enough ends to add a cluster of beads when attaching to the wooden
bead.
Row 3 leave a very small space between each ring.
NB slip the wooden bead in place, before completing this row, when the gap is just
big enough to do so.
R.A 4, p, 4, + with a bead to a picot on the opposite side of a split ring of row 1, 4,
p, 4 cl
* R.B 4, + to ring A, 4,+ with a bead to the picot on the next split ring of row 1, 4, p,
4 cl
Repeat from * 5 times making all the joins as for row 2, and slipping in the wooden
bead before the gap is too small.
©
J
e
n
n
if
e
r
W
il
li
a
m
s
2
0
0
4
11
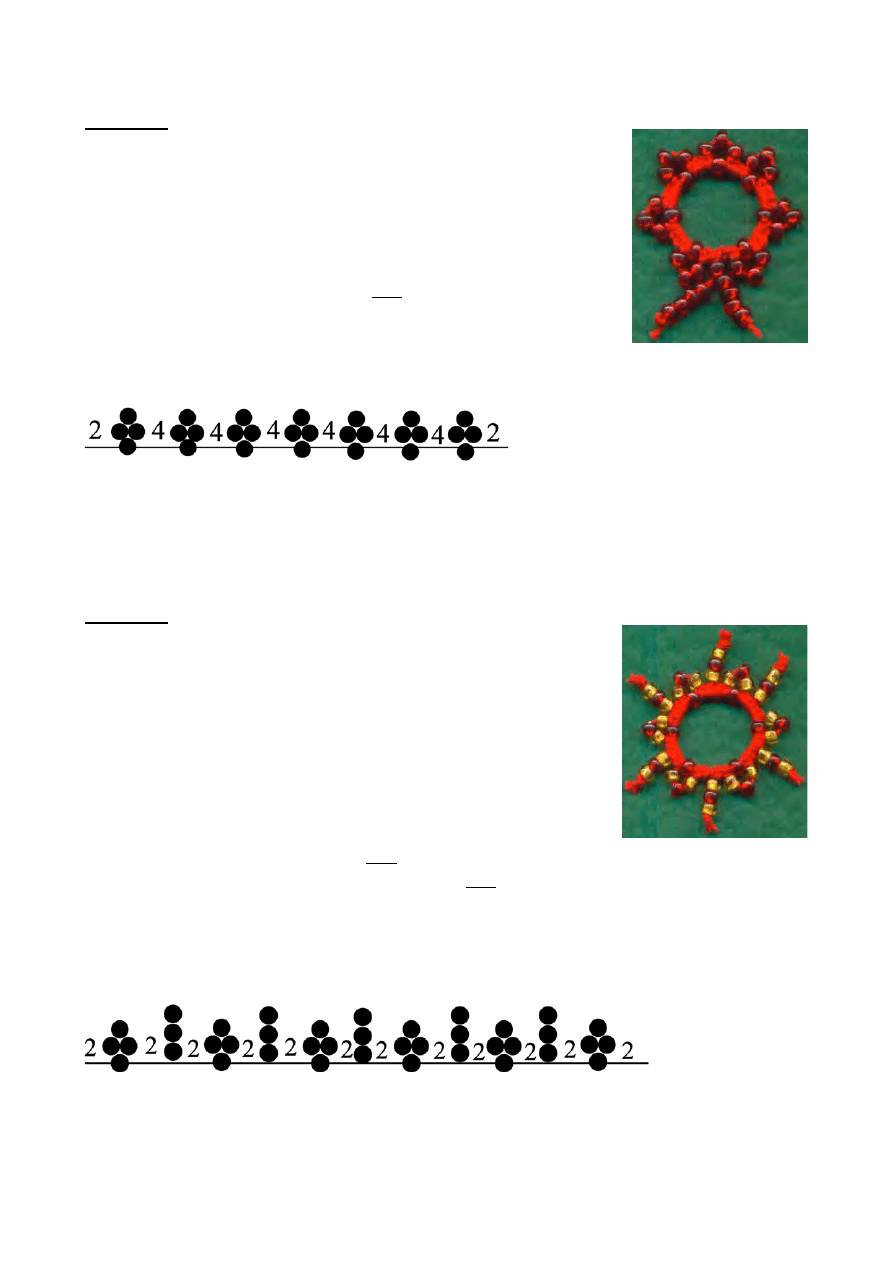
Decorations
These are just ideas on which you can build.
1) Work with size 20 thread. Changing the colours and mix of beads will result in a
variety of decorations.
2) To make the rings a real circle I used mock rings (a chain with, either a paperclip
as an anchor, leaving a small hole when removed later to which to tie your ends, or
just a loop through which the shuttle is passed before the mock ring is closed.)
3) When you have closed the mock ring string the required number of beads onto
each of the two threads, push them up close to the mock ring, then make two or three
knots, one on top of the other, close to the beads, cut and secure with clear nail
varnish.
NB the knots must be bigger than the hole in the bead to prevent the beads slipping
off.
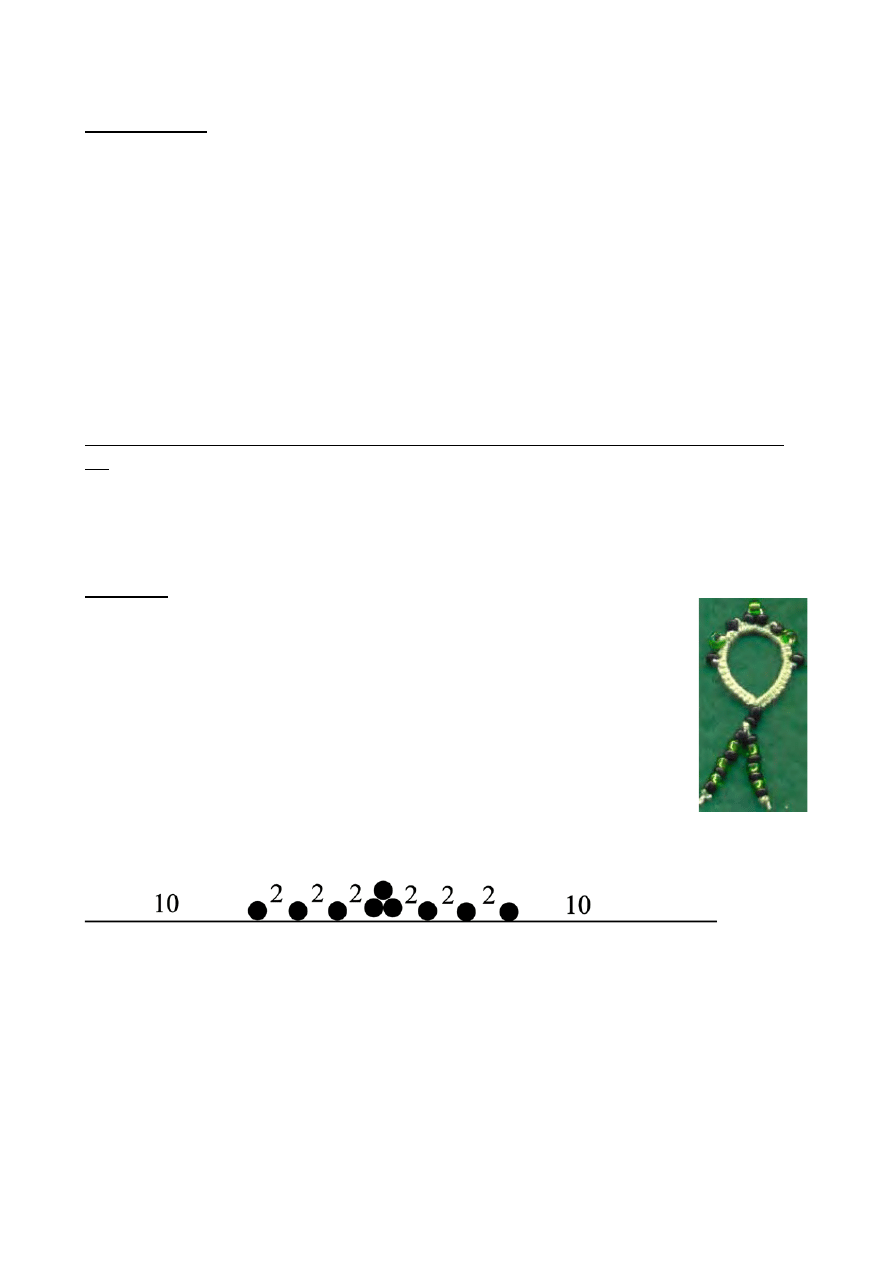
Pattern 1
String 9 beads and wind about 12 inches / 30 cms on your shuttle.
Position the beads on the ball side before you start the mock ring.
Start the mock ring with a paper clip or large loop (see note above) and
-
Chain 10, B, 2, B, 2, B, 2, 3B, 2, B, 2, B, 2, B, 10.
Pull up the ring, cut leaving 5 inch / 12 cms ends and tie to secure.
String 2 beads onto the two threads together, then 7 beads on each
thread, push up close to the tatting and knot, then secure with clear
nail varnish.
©
J
e
n
n
if
e
r
W
il
li
a
m
s
2
0
0
4
12
Pattern 2
String 28 beads and wind your shuttle with about 12 inches /
30 cms thread and 7 of the beads, leaving 21 beads on the ball
side.
Start the mock ring with a paper clip or large loop (see note
before Decoration pattern 1) and -
Chain 2, *3B (from ball thread) and B (from shuttle), 4,
repeat from * 6 times but work only 2 instead of 4 ds on the
last repeat.
Finish as for pattern 1.
Pattern 3
The stacked beads are threaded on VERY LONG PICOTS at
the end. These very long picots should each be long enough
to enable you to knot them when the beads are added.
String 24 beads and wind your shuttle with about 12 inches /
30 cms thread and 6 of the beads, leaving 18 beads on the
ball side.
Start the mock ring with a paper clip or large loop (see note
before Decoration pattern 1) and -
Chain 2, *3B (from ball thread) and B (from shuttle), 2, VLP, 2,
Repeat from * 4 times, 3B (from ball thread) and B (from shuttle), 2
Finish as for pattern 1.
Using a fine crochet hook thread 3 beads on each of the long picots, push them up
close to the tatting, knot as before and secure with clear nail varnish.
©
J
e
n
n
if
e
r
W
il
li
a
m
s
2
0
0
4
Wyszukiwarka
Podobne podstrony:
Pattern Peyote Fall Tree
uk ad pokarmowy
MonikiKamica uk éadu moczowego
Wybrane choroby nerek i uk adu oddechowego
1510478 8000SRM0988 (06 2005) UK EN
1568204 0700SRM1159 (08 2005) UK EN
Zaka enia uk adu1, VI rok, VI rok, Pediatria, Pediatria, PEDIATRIA OLA, pediatria IV V, Choroby dzie
UK+üAD WSP+ô+üCZULNY, Biologia II, Fizjologia zwierząt i człowieka
rozr·d- budowa uk-adu rozrodczego, sem II
Giełdy uk oddechowy
6Przyk adowe uk ady automatyki
Badanie uk prcent C5 prcent 82adu ABS
Pattern Peyote Little Mouse Amulet
1566043 0620SRM1115 (08 2005) UK EN
JG RUST Patterns 9 15
1554631 2000SRM1085 (03 2004) UK EN
więcej podobnych podstron