
Items and backlogs module
Lantek Expert III
3.4 How to manage the cost of the items?
In this section, you learn to manage the cost and sale prices of items using different
strategies. The different strategies in Expert III include the following:
x Type of costs: The Items and backlogs module manages the costs of
the following:
Costs associated with purchase items or manufacturing items includes the
following costs:
1. Standard cost of purchase items is the fixed cost based on purchase price
of an item.
Standard cost of manufacturing items is the theoretical cost based on sum
of raw materials, labor, and work centers.
2. Current cost of purchase items is automatically calculated based on the
warehouse movements and defined in Expert III through the field ‘Current
cost method’
(Refer Figure 14: Items (Details) in page 16)
as follows:
x ‘FIFO’: First In, First Out.
x ‘LIFO’: Last In, First Out.
x ‘Average’: Average of the items in the warehouse.
Current cost of manufacturing items is automatically calculated based on
the actual manufacturing costs of the item after the labor tickets have been
validated. It is calculated based on the labor quantity and cost, machines
used, material quantity, and cost. If the item is a manufacturing item, the
cost is updated by Lantek WOS (Work Operating System).
3. Cost by ranges of purchase items defines different costs for each range of
products.
Cost by ranges of manufacturing items is calculated based on the
production volume during the manufacturing process of an item.
x Type of sales prices: The Items and backlogs of Expert III defines the
sales prices in the following ways:
Sales prices based on the cost or profit: The system calculates the sales
prices according to the cost or profit that you define in the Sales prices
table.
19

Lantek Expert III
Items and backlogs module
To calculate the sales prices based on the cost, do the following:
1.
In the Items (Details) window
(refer Figure 14: Items (Details)
in page 16)
, click the Sales prices tab at the bottom of the
window.
2.
On the File menu, point to New, and then click Create new
element or click (
) on the standard tool bar, and assign
tariff, currency, and quantities.
3.
Enter either a percentage in the ‘Percent’ field or a profit value
in the ‘Profit’ field. The system automatically calculates the other
value. The system calculates the final price based on the cost of
the item and the profit value entered.
Fixed sale price: You can fix the sales prices for the items to sell. To fix the
sales prices, do the following:
1.
In the Items (Details) window
(refer Figure 14: Items (Details)
in page 16)
, select the ‘Fixed price’ check box.
2.
Click the Sales prices tab at the bottom of the window.
3.
On the File menu, point to New, and then click Create new
element or click (
) on the standard tool bar, and assign
tariffs, quantities, and fixed price for the item. The system
automatically calculates the ‘Profit’ and ‘Percent’ fields.
x Type of profits: The Items and backlogs module calculates the profits in
the following ways:
Profit based on ‘Margin’: Percentage of the sales price is applied to
calculate the profit.
Profit based on ‘Markup’: Percentage of the item cost is applied to
calculate the profit.
20
Items and backlogs module
Lantek Expert III
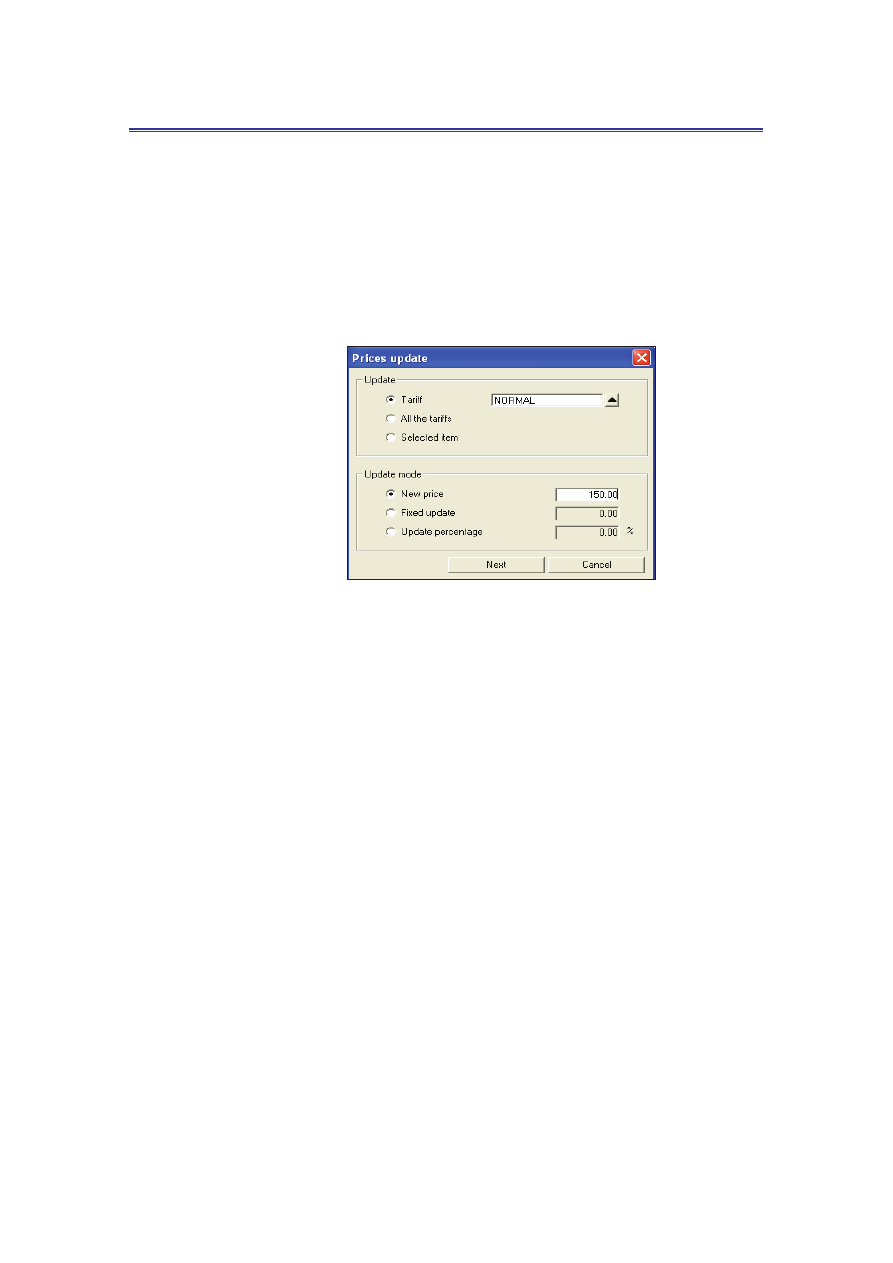
3.5 How to update the prices of tariffs?
To update the prices of tariffs, do the following:
1. In the Items table, click Actions list and then select Prices update.
2. The system displays Prices update dialog box.
Figure 16: Prices update
3. In the ‘Update’ section, you can select from the following options:
x
‘Tariff’: It updates the price for a selected tariff. You can
navigate to the Tariffs table to select the required element.
x
‘All the tariffs’: It updates the price for all the tariffs.
x
‘Selected item’: It updates the price of tariff only for a specific
item.
4. In the ‘Update mode’ section, you can select from the following options:
x
‘New price’: Enter the new price of the tariff.
x
‘Fixed update’: Enter a fixed price, which will be added to the
existing price of tariff.
x
‘Update percentage’: Enter a percentage based on which the
existing price of tariff will be updated.
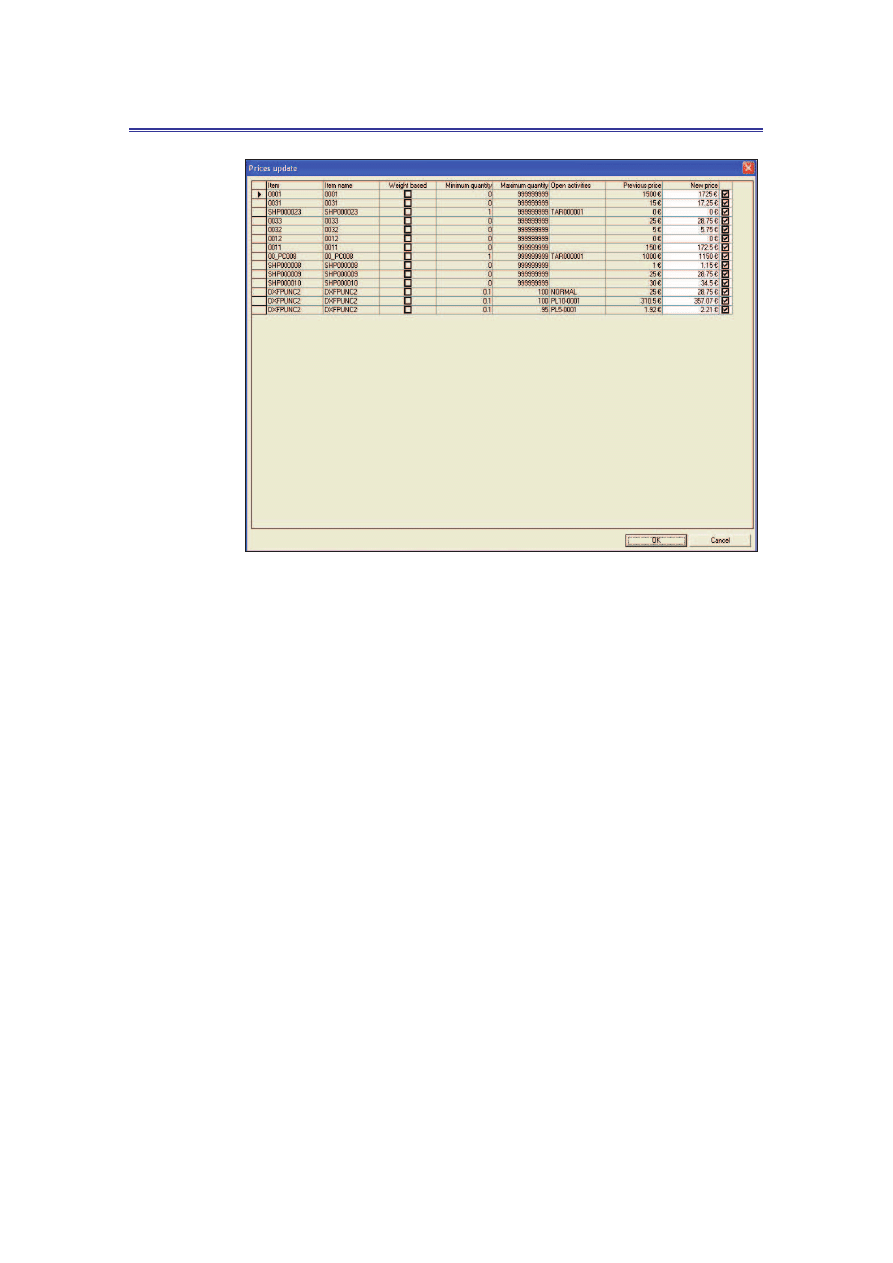
5. Click Next. The system displays Prices update window displaying the
previous and new prices. You can also enter the new price of the tariff in
this window.
21
Lantek Expert III
Items and backlogs module
Figure 17: Prices update
6. Click OK. The prices of tariffs are updated in the Items prices table.
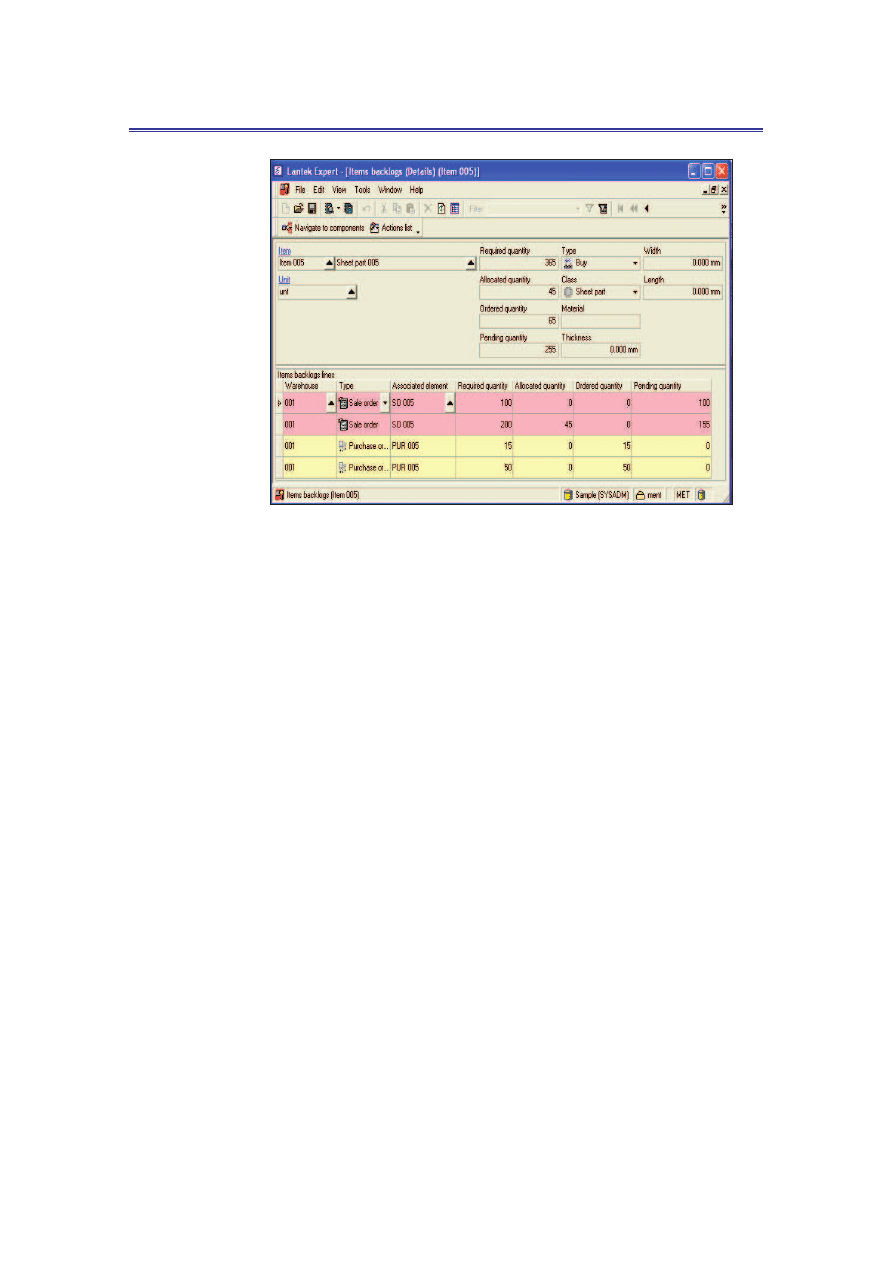
3.6 Items backlogs
The Items backlogs table can be used to identify the backlogs of items that arise due
to the unavailability of items in the warehouse (Main menu -> Items and backlogs ->
Items backlogs).
Using Expert III, you can define the backlogs as follows:
x Sale order: The backlogs are generated when the sale order is accepted
or updated.
x Workcenter: The backlogs are generated when the manufacturing order is
exploited.
x Job: The backlogs are generated when the nesting job is in the
CAD/CAM module.
x Warehouse: The backlogs are generated when the item reaches the
defined minimum quantity.
22
Items and backlogs module
Lantek Expert III
Figure 18: Items backlogs
The Items backlogs table provides you information regarding the ‘Type’, ‘Class’,
‘Material’, ‘Thickness’, ‘Length’, and ‘Width’ of the item.
This table also allows you to manage the reserve items by establishing them as
pending and leaving the quantities as stock, to use up other reserves. You can
reserve quantities from any warehouse where the stock exists.
23
Lantek Expert III
CRM module
CHAPTER
4
4 CRM module
The Expert III CRM is the complete business strategy steered in favor of customers needs.
In this chapter, you will learn how to manage the business relationship in an organized way
by recording the contacts and categorize different types of customers.
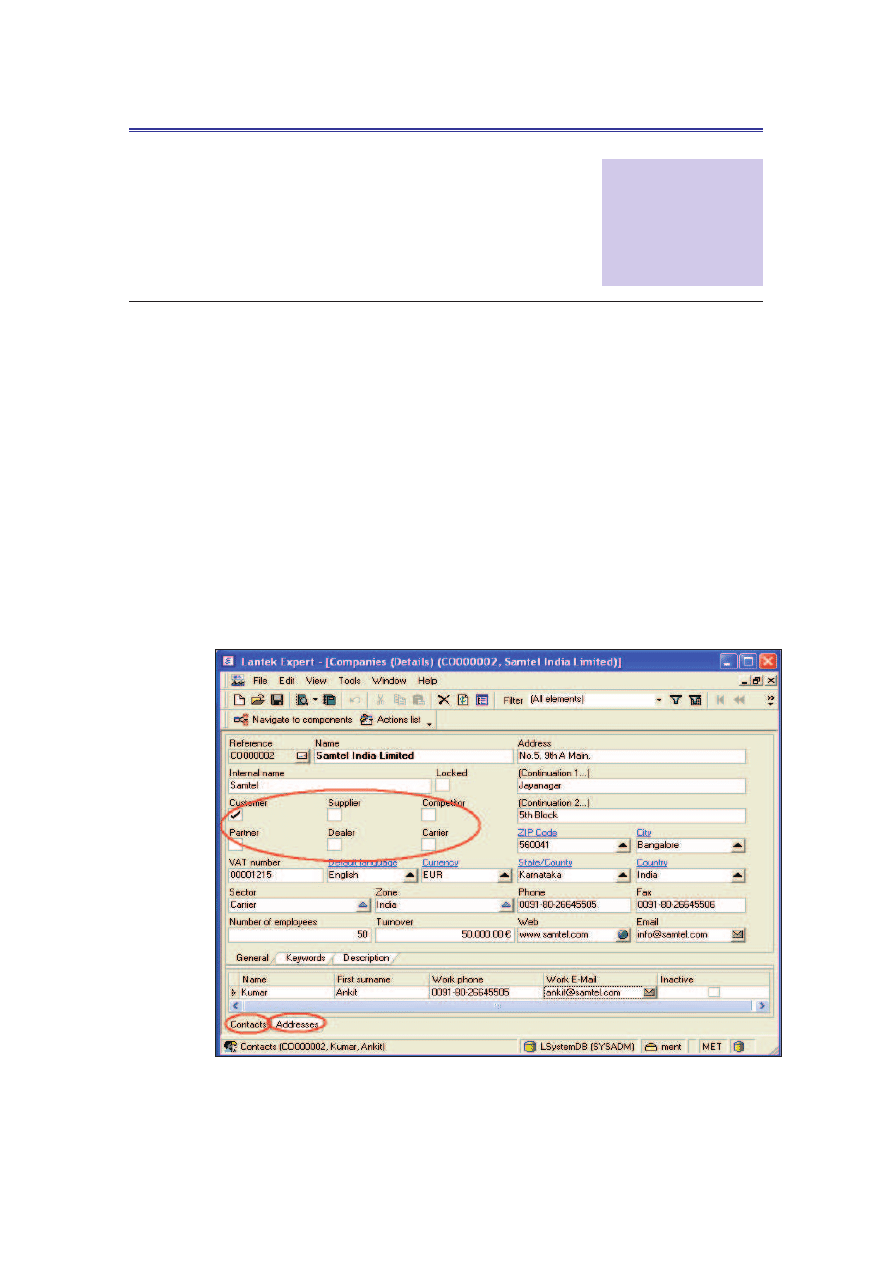
4.1 How to manage companies and contacts?
The Companies table helps to manage all the information of customers and other
companies you deal with such as suppliers, competitors, and so on (Main menu ->
CRM -> Companies).
Figure 19: Companies (Details)
24

CRM module
Lantek Expert III
You can record the company’s details as follows:
1. On the File menu, point to New, and then click Create new element or
click (
) on the standard tool bar
2. Enter the required details and select the required check box to select the
type of company, if it is a customer, supplier, competitor, and so on
(refer
Figure 19: Companies (Details) in page 24).
3. On the File menu, click Save or click (
) on the standard tool bar.
You can manage the contacts directly in the Contacts table (Main menu -> CRM ->
Contacts).
You can also enter additional details about the associated companies in the
Invoicings auxiliary data table (Main menu -> CRM -> Companies -> Navigate to
components -> Invoicing auxiliary data).
In case there is more than one contact address, you can record and manage them
by navigating to the Addresses table or through Addresses tab at the bottom of the
Companies (Details) window
(refer Figure 19: Companies (Details) in page 24)
.
4.2 How to manage customers with pending
payments?
The Dunning application in CRM module helps in managing the pending payments.
You can track all the customers with the pending payments through the Dunning
window (Main menu -> CRM -> Dunning).
Figure 20: Dunning
25
Lantek Expert III
CRM module
You can view the details of the customers based on the dunning levels, invoices,
charged values, and companies using the ‘Filters’ section
(refer Figure 20:
Dunning in page 25)
.
You can click Setup button to set the dunning levels with the charged values and
also attach the reminder documents to be sent to the customers with pending
payments.
This application also allows you to set new levels, payment dates, and also lock the
customers.
#
The Dunning application is activated only if you configure it in the
Main menu -> Sales management -> Configurations elements ->
Configure parameters -> Modules parameters. Double click General in
the Modules parameters dialog box and the system displays General dialog
box. Select the ‘Dunning management’ check box in this dialog box to
activate the Dunning application.
4.2.1 Execute the Dunning Application
To execute the Dunning application, do the following:
1.
In the Companies table, select a customer company, then
navigate to the Invoicings auxiliary data table.
2.
Enter and save the data related to dunning such as the
‘Approval date’, ‘Approved credit’, ‘Risk threshold’ and so on in
the Risk management tab of the Invoicing auxiliary data table.
3.
You can now create a new sale order
(refer 5.2 How to create
and manage sale orders? in page 32)
for the selected
company and also record the required sale order lines for an
item with sale price.
4.
When you try to accept the sale order of the customer company
who has exceeded the credit limits, the system displays a
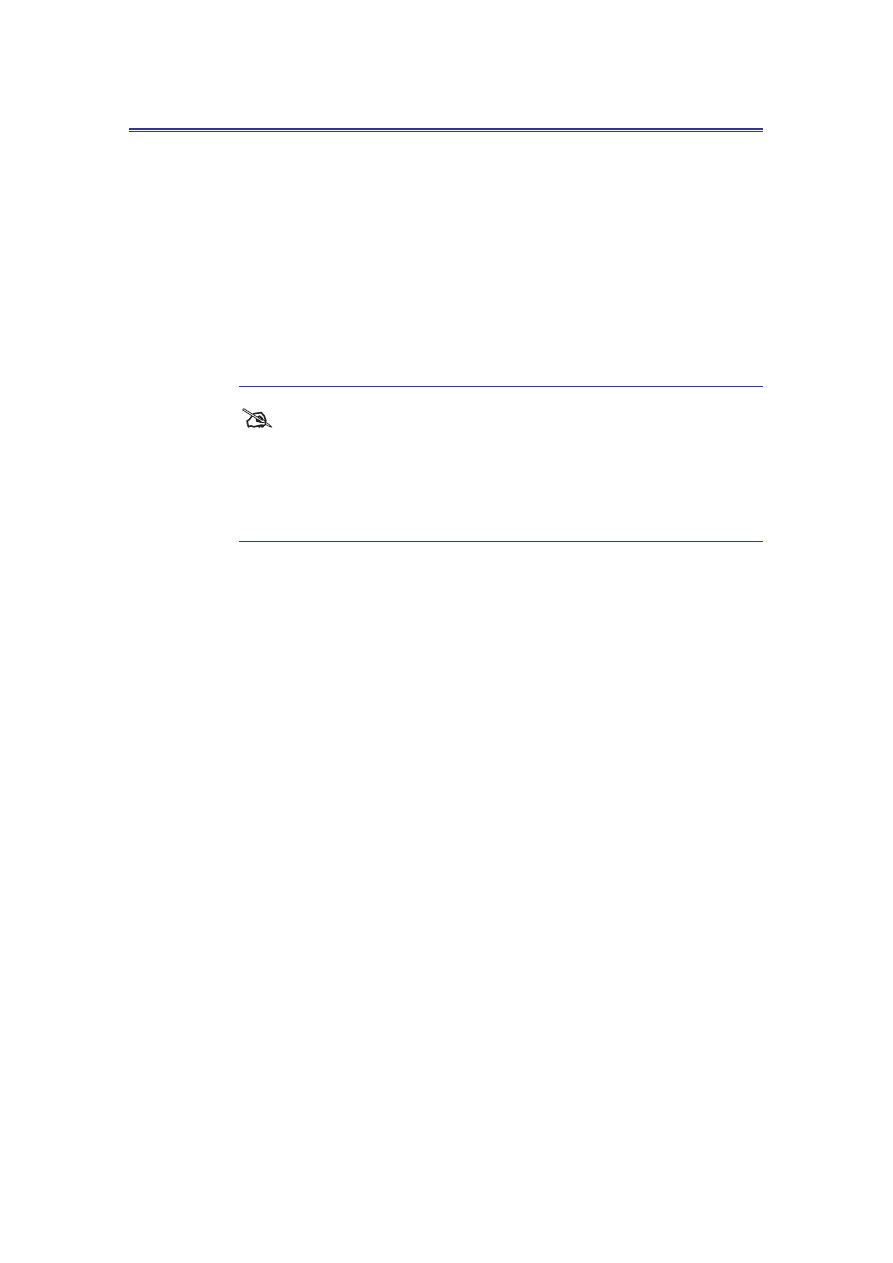
warning message indicating that the risk threshold has
exceeded.
26
CRM module
Lantek Expert III
Figure 21: Warning
5.
Click Close (
) button to close the above warning message
and the system displays the Warning dialog box.
Figure 22: Warning dialog box
6.
The system allows you to select the required option as follows:
x
‘Postpone sale order’: Select this to postpone the sale order
creation for a later date, select ‘Lock customer’ check box to
block the customer.
x
‘Increase the limit’: Select this option to increase the credit limit
of the customer and enter the new credit limit in ‘New’ field.
x
‘Allow sale order’: Select this option to continue with the current
sale process, select the ‘Lock customer’ check box to lock the
customer after this transaction.
7.
Click OK. The respective dunning details are recorded and
when the respective sales invoice is created, the invoice details
are also displayed in the Dunning window
(refer Figure 20:
Dunning in page 25)
.
27
Lantek Expert III
Sales management module
CHAPTER
5
5 Sales management module
To support the complexity of selling process, various functionalities are available in the
Expert III Sales management module.
In this chapter, you learn to create and manage quotations, discounts, sales orders, delivery
notes, and so on. You can also manage the limited credit of the customer using this module
(refer 4.2.1 Execute the Dunning Application in page 26).
5.1 How to create and manage the quotes for
products?
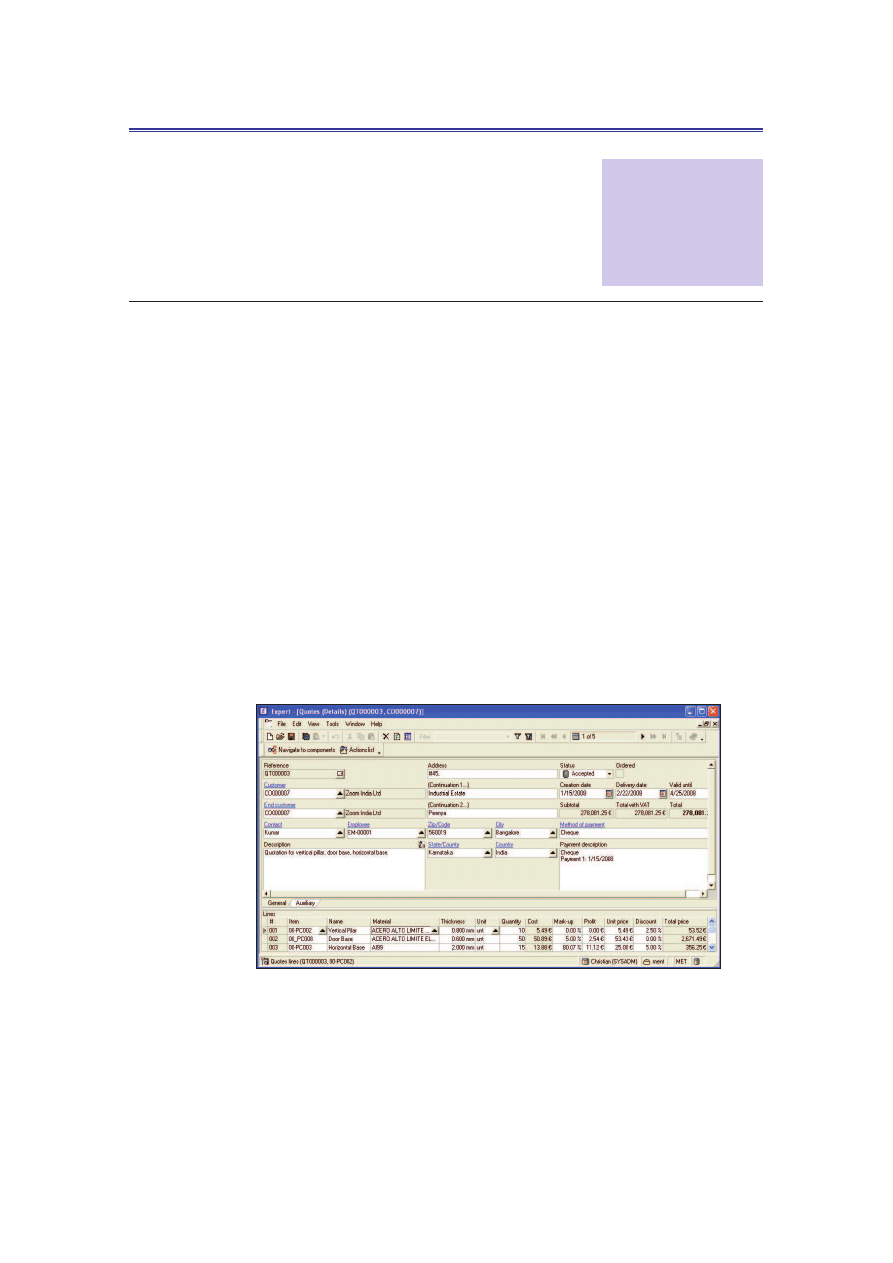
You can create and manage the information related to quotes in Quotes table (Main
menu -> Sales management -> Quotes).
Figure 23: Quotes (Details)
28
Sales management module
Lantek Expert III
To create a quote, do the following:
1. On the File menu, point to New, and then click Create new element or
click Create new element (
) button on the standard tool bar.
2. Enter the required details and on the File menu, select Save or click
Save (
) button on the standard tool bar.
#
You can get the customer’s address through Actions list.
You can click Actions list and then select Quote against project to create a
quotation against a project.
5.1.1 Create lines for the quotes
You can create lines for the quotes in the Quotes window or from the
Quotation tool application.
To create lines for the quotes in the Quotes window, do the following:
1.
In the Quotes table, select the quote for which you want to add
lines.
2.
Click Navigate to components, and then click Lines. The
system displays the Quotes lines table. You can also access the
Quotes lines below the Quotes (Details) window
(refer Figure
23: Quotes (Details) in page 28)
3.
On the File menu, point to New, and then click Create new
element or click Create new element (
) button on the
standard tool bar.
4.
Enter the required details and on the File menu, click Save or
click Save (
) button on the standard tool bar.
To create lines for the quotes using Quotation tool, do the following:
1.
In the Quotes table, select the quote for which you want to add
lines.
2.
Click Actions list, and then click Quotation tool. The system
displays Quote window.
29
Lantek Expert III
Sales management module
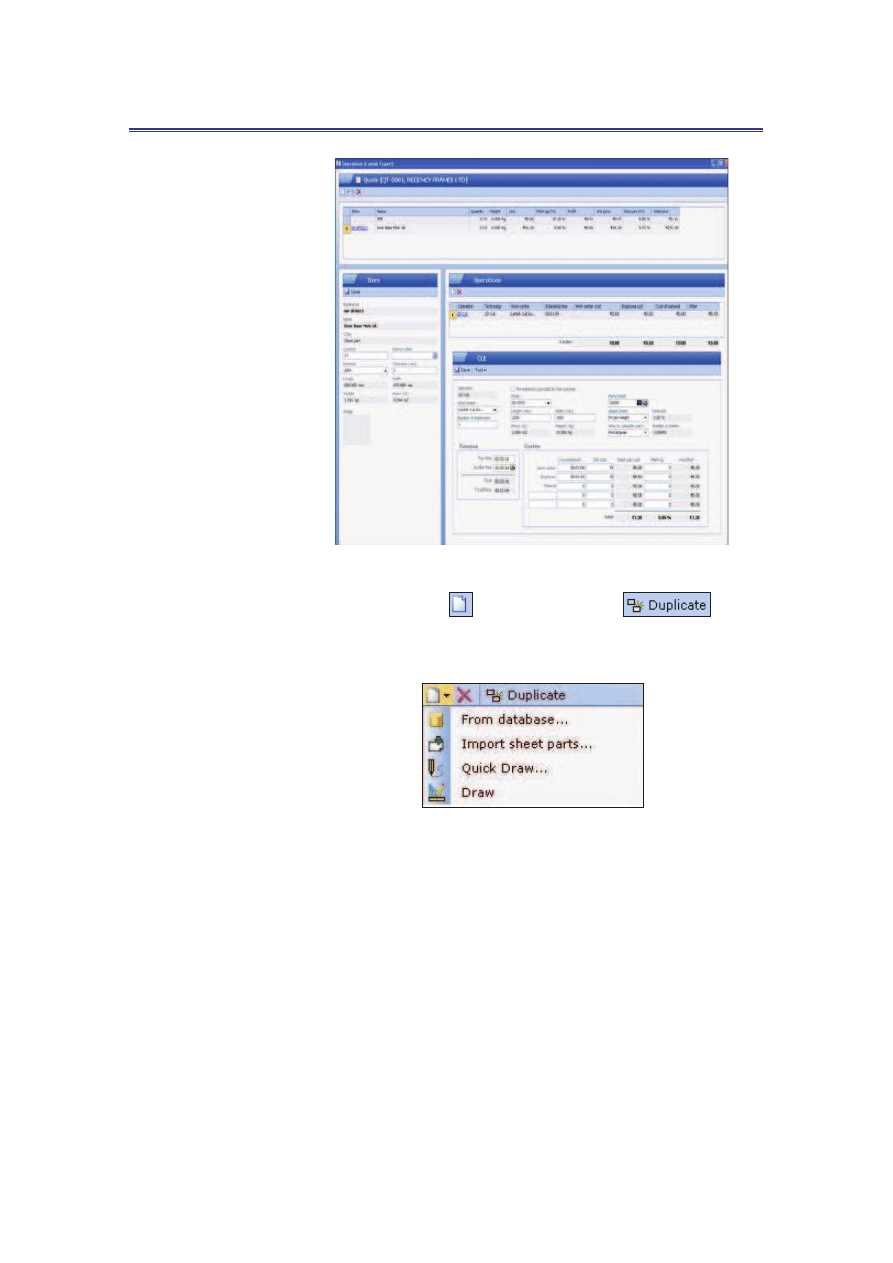
Figure 24: Quote – Quotation tool
3.
Click the New (
) button or Duplicate (
) button
on the standard tool bar. Click the New button, to create a
quotation line based on the following options:
Figure 25: New - options
x
From database: This option helps you to select an item and its
operations from the database to include it to the quotation line.
30
Wyszukiwarka
Podobne podstrony:
LANTEK Expert III Tutorial V28g
LANTEK Expert III Tutorial V28e
LANTEK Expert III Tutorial V28d
LANTEK Expert III Tutorial V28f
Heroes III Tutorial
Tutorial do zadania z SI numer 4, WAT, semestr III, Sztuczna inteligencja
3 tydzień Wielkanocy, III piątek
Jezus III
TBL WYKŁAD III Freud
plsql III
Zaj III Karta statystyczna NOT st
TT Sem III 14 03
Metamorfizm Plutonizm III (migmatyty)
Cz III Ubezpieczenia osobowe i majątkowe
III WWL DIAGN LAB CHORÓB NEREK i DRÓG MOCZ
download Finanse międzynarodowe FINANSE MIĘDZYNARODOWE WSZiM ROK III SPEC ZF
więcej podobnych podstron