34
ENGINE MAINTENANCE
Before Engine Starts (Cont'd)
Installation
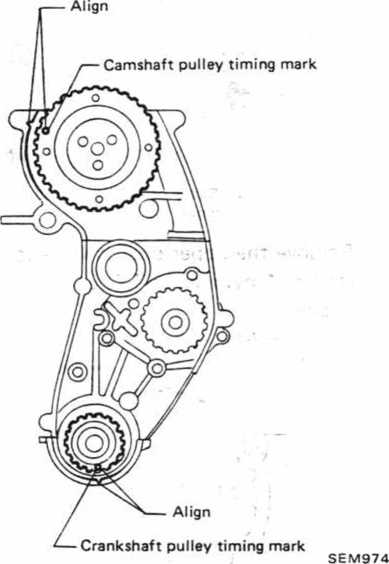
1. Confirm that No. 1 cylinder is at T.D.C. on its compression stroke.

2. Make surę both the water pump pulley and the tensioner rotate smoothly.
3. Set the timing belt. ^r.r
• Make surę the timing belt is clean.
• Set it in the correct direction.:;The arrows painted on the timing belt show its direction of revolution.

4. Instail the tensioner and the return spring.
5. Tighten the lock nut of the tensioner slightl and hook the return spring to the stopper.

7. Instail the lower dust cover and gasket.
8. Instail the crankshaft pulley and tighten it.
H : 69 - 88 N-m
(7.0 - 9.0 kg-m, 51 - 65 ft-lb)
9. After removing all the spark plugs, rotate the crankshaft pulley at least two turns clockwise.
10. Tighten the tensioner lock nut.
RJ : 15-17 N-m
(1.5- 1.7 kg-m, 11 - 12 ft-lb)
11. Check belt tension by pushing midway be-tween the camshaft pulley and the water pump pulley.

Belt deflection:
2 mm (0.08 in)
Applied force:
2.65 - 5.69 N
(0.27-0.58 kg, 0.60- 1.28 Ib)
Wyszukiwarka
Podobne podstrony:
TIMING BELT— I nstallation_ Belt deflection: 2 mm (0.08 in) Applied force: 1. Confirm that No. 1 cyl
ENGINE MAINTENANCEBefore Engine Starts (Cont d) 1. To flush system, open drain cock at bottom of&nbs
ENGINE MAINTENANCEBefore Engine Starts (Cont d) 9. Refill engine with the appropriate new engine&nbs
ENGINE MAINTENANCEBefore Engine Starts (Cont d) Spark pług: Canada Standard type BPR5ES Hot
*ENGINE MAINTENANCEBefore Engine Starts (Cont d) REPLACING TIMING BELT Removal 1.
ENGINE MAINTENANCEBefore Engine Starts CHECKING DRIVE BELT 1. Inspect for cracks f
Suzuki RM125p 5-6 ENGINE REMOVAL AND INSTALLATION • Remove the cotter pin ® and br
ENGINE OVERHAULInspection (Cont d) PISTON RING GAP CRANKSHAFT INSPECTION 0.8(0.031) / Ring gap mm
ENGINE OVERHAULAssembly (Cont d) 2. Select suitable thickness of main bearing according to the follo
ENGINE OYERHAULAssembly (Cont d) 6. Measure connecting rod clearance. 5. Tighten bearing cap bolts t
18581 Suzuki RM125g ENGINE REMOVAL AND INSTALLATION 5-3ENGINE REMOYAL AND INSTALLATIONREMOVAL ♦ &nbs
NS/GS9 - 58 ENGINE- REMOVAL AND INSTALL ATI ON (COfltmued) Fig. 30 Mess uring Platon Protmaion Mao
S8 4 2 (340 koni)? 00 Audi S8 4,2 19964)0 Engine codę: AHC Installation 1 Ensure each camshaft sproc
Suzuki RM125f 5-2 ENGINE REMOVAL AND INSTALLATIONEXTERIOR PARTS ! / 7*" K&q
Suzuki RM125h 5-4 ENGINE REMOVAL AND INSTALLATION • Remove the exhaust pipę fiłting springs with the
Suzuki RM125r 5-8 ENGINE REMOVAL AND INSTALLATIONINSTALLATION • Reassemble the rem
36818 Suzuki RM125q ENGINE REMOVAL AND INSTALLATION 5-7 engine mounting bolts and plates swlngarm pi
39359 Suzuki RM125s ENGINE REMOVAL AND INSTALLATION 5-9 * Reassemble the drive Chain clip so the sli
A2 1 4 (75 koni)� 02 Audi A2 1,4 2000-02 Engine codę: AUA Installation 1. Ensure l
więcej podobnych podstron